Tuesday, October 9, 2012
Wednesday, August 1, 2012
Select All the Keys at One Frame in Curve Editor
Whenever I used [Curve Editor] in 3ds Max, I always wondered why I couldn't easily vertically select all the keys at one frame. Now I have figured out the easy way. I should use [Track Bar] for it. Because [Track Bar] is away from [Curve Editor], they seemed to be so unrelated that I couldn't realize it, but the method seems to be official.
I'll show you the picture. Note those red rectangles.

As shown in the picture, if you select a collective key on [Track Bar] at the bottom, it gets highlighted and the corresponding keys in a pillar in [Curve Editor] in the separate floating window also get highlighted.
You can also move a pillar of keys in [Curve Editor] by grabbing and dragging the correspodning collective key on [Track Bar].
As a matter of fact, you don't need to use [Curve Editor] so as to deal with the all the key at one frame. You have only to use [Track Bar] for it.
Tuesday, July 31, 2012
Cut an Action of Biped Animation
If you animate a biped for a video game, you have to arrange a series of short discrete actions of the biped one after another in a row on one single timeline. When you export the biped animation, you give each of the actions a start time, an end time and a unique name and then the video game identifies each of the actions by the name to play it. The data is represented so that an action comes after the previous action has finished playing. One action is definitely not along the continuity from the previous one and on to next one even though they are so arranged.
Here is a serious problem with 3ds Max 2011. 3ds Max 2011 doesn't provide you with the method that splits the animation sequence of a biped into discrete actions. When you have finished making a action and freshly start making a new action, you will find that your new keys somehow affect the movement of the previous action. How strange it is! That is because 3ds Max tries to help smooth out your animation between your keys. This is known as interpolation, which has been done for every key of any biped movement in the previous action. So it also smoothes out between the last key of the previous action and the new key of the new action. If the last key of a part of the biped is up front in the previous action, away from the new key of the next new action, things look worse. That's not what you want. You want to stop affecting the previous action.
Unfortunately I couldn't find such an option as no interpolation for biped keys. If it were not for a biped, you could use [Set Tangents to Step] in [Track View-Curve Editor]. Alas, it doesn't work for bipeds. How can you sever the previous action and isolate each action.
I finally came to use two redundant keys which confine the unintentional interpolation between them. Here is how I do it.
-
Let's say you have finished the first action of a biped animation.
Let's assume you have finished it at frame 50. Move the time slider onto the 50th frame. Make sure you are in [Auto Key] mode. -
 Let's select all the tracks of your biped's Center Of Mass(COM).
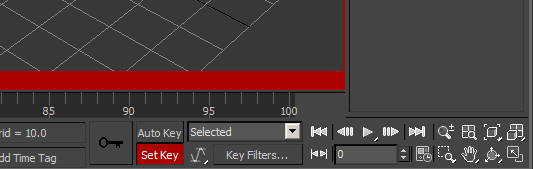
Click any part of the biped in one of the viewports. Note those pink rectangles in the right figure. At the top of the right column, click Motion tab to activate Motion panel and find [Track Selection] roll-out on it. Click the fourth button, [Lock COM Keying] with the lock icon on it in the roll-out and you will see it turned into yellow like it is pressed. Click all the three buttons to the left of [Lock COM Keying] button and all the three buttons also turn into yellow. -
Let's select the whole biped.
Note those red rectangles in the figure below. Open [Schematic View] by clicking [Schematic View(Open)] button, the 5th button from the right of the main toolbar. Find the root node of the biped's tree diagram and double-click it to select all the parts of the whole biped.
-
Let's manually set keys.
Make sure you don't lose the selection. Note those yellow rectangles in the right picture above. Go to to Motion panel and open [Key info] roll-out. Click [Set Key] button, i.e. the first button so as to set the keys over the whole biped. -
Let's copy all the keys at the finishing frame to the next frame.
Make sure again that the whole biped is still selected. At the bottom of the main window with the viewports, click the collective key at frame 50 on [Track Bar] under [Time Slider] and it will get brighter to indicate it's selected. Press and hold Shift key on your keyboard and meanwhile click and drag the selected key, i.e. the 50th and release your mouse at the very next frame, i.e. 51st. Now the finishing key is copied as shown in the next picture. Note the two black squares at 50, 51 in the next picture.
-
Let's release [Track Selection] buttons.
Back to Motion panel, click the yellow [Lock COM Keying] button to turn it into the previous color and then toggle off the three buttons to the left of [Lock COM Keying] button. All the four buttons should not be yellow. -
Start working a new action from the second next frame.
Move the time slider onto the second next frame, i.e. the 52nd. Start your new action. The previous action will not be affected at all by the next new action.


Now we can delimit each action of a biped in order to separate them on one single timeline.
Saturday, July 21, 2012
iPhone(iOS) multi-touch with Ogre without OIS
I found that OGRE's OIS is not capable of dealing with multi-touch on iPhone and iPad and that it does not recognize the orientation of the device. So I started writing my own code for it. Finally I uploaded my code as Xcode 4.3 static library project onto github.com. The address of my git repository's home page is http://github.com/DuncanSungWKim/OgreAssistKit.
In this blog I briefly explain how to use it. This guide assumes that you are using the modified BaseApplication from my git repository which I tweaked to give it an option that disables OIS. You may have set up your project according to the prerequisite guide. However, you can always use your own framework.
I don't point out every detail because I believe that you, as a seasoned programmer, can handle any easy chores entailed in this process.
- Let's add the base class constructor BaseApplication(false) to your own BaseApplication-derived class' initialization list.
The 'false' argument disables OIS. This is not in the original framework code. I added that option by myself. - Let's add a native window handle as instance(member) variable to your own BaseApplication-derived class.
We need to prevent OGRE from creating its own window and give it our own native window which we create by ourself. This variable is used to pass the handle over. Initialize this variable through a parameter of your own BaseApplication-derived class's constructor.
This variable should be of int type. - Let's override BaseApplication::configure() as following.
bool YourOwnBaseApplicationDerivedClass::configure() { mRoot->initialise( false ) ; mWindow = OgreAssistKit::CreateRenderWindowWithNative( mRoot, m_iNativeWindowHandle ) ; return true ; } - Let's inherit the interface class OgreAssistKit::TouchListener.
Implement each of the methods in your own BaseApplication-derived class. - Let's add the native window handle as instance(member) variable to the app delegate objective-C class.
This variable should be of pointer type to class OgreAssistKit_UIWindow. I also assumes that you already have the pointer to your own BaseApplication-derived class instance in this class' @interface portion. For example,@interface YourAppDelegate : UIResponder <UIApplicationDelegate> { OgreAssistKit_UIWindow* m_oNativeWindow ; YourOwnBaseApplicationDerivedClass* m_pYourOwnBaseApplicationDerivedClassInstance ; } -
Let's create our own native window and pass it over.
Add the following code to application:didFinishLaunchingWithOptions: method before creating your own BaseApplication-derived class instance.m_oNativeWindow = [ [OgreAssistKit_UIWindow alloc] initWithFrame:[UIScreen mainScreen].bounds ] ;Then pass it as an argument to your own BaseApplication-derived class' constructor through reinterpret_cast while creating the instance.
After being created, it needs to be known to the native window through the interface OgreAssistKit::TouchListener as following.m_oNativeWindow->m_pTouchInput->SetListener( m_pYourOwnBaseApplicationDerivedClassInstance ) ; - Let's sense orientation changes.
Add the next code at the end of application:didFinishLaunchingWithOptions: method.[ [NSNotificationCenter defaultCenter] addObserver:self selector:@selector(orientationDidChange:) name:UIDeviceOrientationDidChangeNotification object:nil ] ; [ [UIDevice currentDevice] beginGeneratingDeviceOrientationNotifications ] ;Then add orientationDidChange: method into the app delegate class' @implementation portion as following.-(void) orientationDidChange:(NSNotification*)a_oNotif { UIDeviceOrientation ort = [UIDevice currentDevice].orientation ; m_oNativeWindow->m_pTouchInput->set_Orientation( OgreAssistKit::ToOgre(ort) ) ; } - Let's clean up on termination.
In applicationWillTerminate: method, call UIDevice's [endGeneratingDeviceOrientationNotifications], NSNotificationCenter's [removeObserve:] and OgreAssistKit_UIWindow_CleanUp().
Do not forget to release the native window, either.
Tuesday, July 17, 2012
Why Ogre::MeshManager::createPlane upVector is UNIT_Z
It really confused me that Ogre::MeshManager::createPlane() method takes both a plane with a normal vector and an up vector as 'upVector'. When you already know the upward normal vector due to the plane the method takes, what's the use of 'upVector' parameter? I found the answer from the next linked web forum page.
'upVector' parameter is actually the V axis of the texture. The U axis of the texture is obtained by the cross product of the normal vector and the V axis vector. If 'upVector' parameter is UNIT_Z, the V axis of the texture is along the Z axis.
If 'upVector' should be UNIT_Y as you might intuitively think because of the name, the U axis can not exist so the texture can not be shown. Further, the app can crash. I think it should have been named 'vAxis' to prevent this confusion.
Wednesday, June 27, 2012
Set up XCode 4.3 for Official Ogre Tutorials on iPhone(iOS)
In this guide, we are going to set up the environment of XCode 4.3 for the very first official Ogre tutorial in order to run it on iPhone(iOS). You can keep applying this guide to the subsequent tutorials.
Green lines of code mean you have to add them. Struck red lines of code mean you have to remove them from the original code.
Green lines of code mean you have to add them. Struck red lines of code mean you have to remove them from the original code.
- Let's install OGRE 1.8.0 SDK for iOS.
Download it from here. Make a folder called Ogre_iOS in a folder that contains your own projects. Open the downloaded package and drag OgreSDK folder from within the package into our newly created folder Ogre_iOS. Rename it to SDK_1.8.0. I will use the folder name 'Ogre_iOS/SDK_1.8.0' to indicate the SDK root folder. - Let's create a tutorial project.
Run XCode 4.3 and from the main menu select File-New-Project. In the dialogbox that has popped up, select the [Simple View Application] in iOS-Application section as in the next picture.
Click Next button in the bottom-left corner and name the project BasicTutorial1. Click Next button and Finder dialogbox pops up to let you decide the parent folder which this project's top folder will reside in. Choose the parent folder which contains Ogre_iOS folder and then click Create button in the bottom-right corner so that 'Ogre_iOS' folder and this project's top folder are side by side.
Once the project is created, change the extensions .m to .mm of BasicTutorial1/AppDelegate.m and BasicTutorial1/Supporting Files/main.m so that we can use C++. -
Let's add the resource files to this project.
Right-click on the project heading(red rectangle in the next picture) in the left-most column and choose [Add Files to ...] on the popup menu.
In Finder dialogbox that has popped up, find 'Ogre_iOS/SDK_1.8.0/Media' folder and single-click it to stay highlighted. Among the options at the bottom, select [Create folder references ...] as in the next picture. Click Add button in the bottom-right corner of the dialogbox so that the folder structure and all the files in it will be copied into the bundle.
Again like the way we just did, add 'Ogre_iOS/SDK_1.8.0/bin/plugins.cfg' file.
Look away from XCode and by using Finder locate 'Ogre_iOS/SDK_1.8.0/bin/resources.cfg'. This time copy it into the project folder. Again like the way we just did, add the copied resources.cfg into the XCode project. - Let's edit resources.cfg.
Open it and find the line marked as red below in the middle of the text.
...
FileSystem=Media/materials/textures/nvidia
FileSystem=Media/models
#FileSystem=Media/particle
FileSystem=Media/DeferredShadingMedia
...
Insert a #(pound) sign at the beginning of the line like above. This way the line is commented out.
Find [Tests] section at the end of the text as following.... [General] FileSystem=MediaDelete the whole Test section.# Materials for visual tests [Tests] FileSystem=Media/../../Tests/Media - Let's add the include paths.
Click the project heading in the leftmost column and to the right in the second column choose the only item in the first section PROJECT. To the right at the top of the table, select [Build Settings] tab and find [Header Search Paths] row in [Search Paths] section deep in the middle of the table. Double-click the cell on the right of the row so that the input dialogbox pops up. Click the plus-sign button in the bottom-left corner of it to enable an input row and put each of the next green lines into it. Make sure you don't copy the new line character '\n' by dragging for copying.
../Ogre_iOS/SDK_1.8.0/include
../Ogre_iOS/SDK_1.8.0/include/OIS
../Ogre_iOS/SDK_1.8.0/include/OGRE
../Ogre_iOS/SDK_1.8.0/include/OGRE/iOS
../Ogre_iOS/SDK_1.8.0/include/OGRE/RenderSystems/GLES
../Ogre_iOS/SDK_1.8.0/Samples/Common/include
../Ogre_iOS/SDK_1.8.0/include/boost - Let's add the official Tutorial Framework files.
To begin with, download Tutorial Framework from here, which is under [Quick Download] title. Add the four files: BaseApplication.h, BaseApplication.cpp and TutorialApplication.h, TutorialApplication.cpp to this project and follow the instructions from the Guide [Adapt Official Ogre Tutorial Framework for iPhone(iOS)] to adapt them.
If you have gone through those instructions before, you can use your previously adapted files BaseApplication.h, BaseApplication.cpp instead. In this latter case, make sure that we have removed main() in TutorialApplication.cpp.
Otherwise, you can use the next two linked files that I modified by myself. Right-click each of the linked file names and choose the saving option like [Save Linked Stuff As ...] from your web-browser's popup menu.
- Let's add libraries for linking.
Click on the project heading in the leftmost column and to the right in the second column choose the only item in PROJECT section and again to the right at the top of the table choose [Build Settings] tab.In the long table, find [Library Search Paths] row in [Search Paths] section deep in the middle and click on the triangle shape at the beginning of the row to expand the row. Double-click the input cell on the right of Debug row among the expanded sub-rows and the input dialogbox pops up. Click the plus-sign button in the bottom-left corner of the dialogbox to activate an input row and put ../Ogre_iOS/SDK_1.8.0/lib/Debug in the activated row. For Release row next to Debug row, input ../Ogre_iOS/SDK_1.8.0/lib/Release .
Search the table for another row [Other Linker Flags] in Linking section.Single-click the input cell on the right of the row to activate it and put -lOIS -lzziplib -lFreeImage -lfreetype into it. These flags indicate the library files in both Debug and Release library folders that we previously set.
In the second column from the left, click the only item in TARGETS section and to the right at the top click [Build Phases] tab.At the third bar [Link Binary With Libraries] click on the triangle shape at the left to expand the bar and click the plus-sign button in the bottom-left corner. A dialogbox in the next picture pops up. We are going to add iOS' frameworks. Find OpenGLES.framework, QuartzCore.framework in the dialogbox and add them.
Next we are going to add Ogre's library files. Pop up the previous dialogbox again and click [Add Others ...] button in the bottom-left corner. Locate ../Ogre_iOS/SDK_1.8.0/lib/Release folder and add libOgreMainStatic.a libRenderSystem_GLESStatic.a. Locate ../Ogre_iOS/SDK_1.8.0/lib and add libboost_thread.a. - Let's integrate the framework into this project.
Delete the three files: ViewController.h .m .xib from the project and add #import <QuartzCore/QuartzCore.h> for display link.
Open AppDelegate.h and add the next two variables to class AppDelegate.class TutorialApplication ; @interface AppDelegate : UIResponder <UIApplicationDelegate> { TutorialApplication* m_pApp ; CADisplayLink* m_oDispLnk ; }
Open AppDelegate.mm and include TutorialApplication.h. Locate AppDelegate's method application:didFinishLaunchingWithOptions:. Remove the code(struck red lines) related with the view controller from it as following. Add to this method new code that creates and sets up an instance of class TutorialApplication and also add code related with Display Link which calls a new method renderOneFrame of class AppDelegate every screen refresh.- (BOOL)application:(UIApplication *)application didFinishLaunchingWithOptions:(NSDictionary *)launchOptions {Lastly, add code which deletes the instance when the app terminates as following.self.window = [[[UIWindow alloc] initWithFrame:[[UIScreen mainScreen] bounds]] autorelease]; // Override point for customization after application launch. self.viewController = [[[ViewController alloc] initWithNibName:@"ViewController" bundle:nil] autorelease]; self.window.rootViewController = self.viewController; [self.window makeKeyAndVisible];try { m_pApp = new TutorialApplication ; if ( ! m_pApp->setup() ) return NO ; m_oDispLnk = [ [UIScreen mainScreen] displayLinkWithTarget:self selector:@selector(renderOneFrame) ] ; [ m_oDispLnk addToRunLoop:[NSRunLoop currentRunLoop] forMode:NSDefaultRunLoopMode ] ; } catch( Ogre::Exception& e ) { NSLog( @"%s", e.getFullDescription().c_str() ) ; throw e ; } return YES; } -(void) renderOneFrame { m_pApp->get_pRoot()->renderOneFrame() ; }- (void)applicationWillTerminate:(UIApplication *)application { if( NULL != m_pApp ) { m_pApp->destroyScene() ; delete m_pApp ; m_pApp = NULL ; } } -
Let's make this app full-screen.
Dig in the project tree from the heading in the leftmost column down to BasicTutorial/Supporting Files/BasicTutorial1-Info.plist and click it. To the right in the table, right-click on the white space under the last row and a popup menu shows up. Choose [Add Row] on the menu as in the next picture.A new row is created beneath the last row and a list box shows up as in the next picture. Scroll down the list for [Status bar is initially hidden] item and select it.
 Click on the spinner on the right of the newly added row as in the above picture and choose YES from the list.


Monday, June 25, 2012
Adapt Official Ogre Tutorial Framework for iPhone(iOS)
The official Ogre Tutorial Framework doesn't work on iPhone. So we need to tweak it so it can run on iPhone. This guide walks you through for it and tries to minimize the modification to the original.
I believe you have done through to the 6th task in the prerequisite guide for setting up the environment of XCode 4.3. This guide works through by fixing compiler errors in that environment. The 6th task has added the official Ogre Tutorial Framework files to your new project you are currently working on. There should be no include errors. If so, you have to check your include paths.
Green lines of code mean you have to add them. Struck red lines of code mean you have to remove them from the original code.
-
Let's include necessary header files.
For a start, open BaseApplication.h. Define the constant OGRE_STATIC_GLES and include the three headers: OgreStaticPluginLoader.h, OISMultiTouch.h, macUtils.h as following.#ifndef __BaseApplication_h_ #define __BaseApplication_h_ #define OGRE_STATIC_GLES 1 #include <OgreCamera.h> #include <OgreEntity.h> #include <OgreLogManager.h> #include <OgreRoot.h> #include <OgreViewport.h> #include <OgreSceneManager.h> #include <OgreRenderWindow.h> #include <OgreConfigFile.h> #include <OgreStaticPluginLoader.h> #include <OISEvents.h> #include <OISInputManager.h> #include <OISKeyboard.h>
#include <OISMouse.h>#include <OISMultiTouch.h> #include <SdkTrays.h> #include <SdkCameraMan.h> #include <macUtils.h> - Clear out the code inside the body of BaseApplication::windowResized() and remove main() in TutorialApplication.cpp.
-
Let's deal with multitouch code.
We are going to use [Find and Replace in Workspace...] in the main menu Edit-Find. Don't ignore case. Make sure you search only in this project.
- Replace OISMouse with OISMultiTouch.
- Replace MouseEvent with MultiTouchEvent.
- Replace MouseListener with MultiTouchListener.
- Change the method names mouseMoved(), mousePressed(), mouseReleased() in class BaseApplication respectively to touchMoved(), touchPressed(), touchReleased() and remove the last parameter OIS::MouseButtonID id from touchPressed(), touchReleased(). We should accordingly modify both the declarations and the implementations. The calls to injectMouseDown() and injectMouseUp() also require removal of the 'id' parameters.
-
Add touchCancelled() to class BaseApplication.
virtual bool touchCancelled( const OIS::MultiTouchEvent& evt ) { return true ; } - Replace OIS::Mouse with OIS::MultiTouch.
- At this point in the simulator mode you get to see only link errors. If you don't like them, set up the linking libraries by doing the 7th task of the prerequisite guide. but you can keep going with this guide.
-
Let's remove the code related with the keyboard.
Comment out the variable mKeyboard in class BaseApplication and handle the entailed compiler errors by commenting them out. -
Let's revise the code of starting-up and cleaning-up.
To begin with, add the next variable to class BaseApplication.Ogre::StaticPluginLoader m_StaticPluginLoader ;Now modify go(), setup(), the destructor of class BaseApplication as following.void BaseApplication::go(void) {#ifdef _DEBUG mResourcesCfg = "resources_d.cfg"; mPluginsCfg = "plugins_d.cfg"; #else mResourcesCfg = "resources.cfg"; mPluginsCfg = "plugins.cfg"; #endifif (!setup()) return; mRoot->startRendering(); // clean up destroyScene(); }
bool BaseApplication::setup(void)
{
    mResourcesCfg = Ogre::macBundlePath() + "/resources.cfg";
    mPluginsCfg = "plugins.cfg";

    mRoot = new Ogre::Root(mPluginsCfg);
    m_StaticPluginLoader.load() ;

    setupResources();

...
BaseApplication::~BaseApplication(void) { if (mTrayMgr) delete mTrayMgr; if (mCameraMan) delete mCameraMan; //Remove ourself as a Window listener Ogre::WindowEventUtilities::removeWindowEventListener(mWindow, this); windowClosed(mWindow); delete mRoot; m_StaticPluginLoader.unload(); } - Let's modify BaseApplication::setupResource()
Relative paths don't work in iOS. So we attach the bundle path as prefix to them. Don't miss the second addition 'bunPath +'
void BaseApplication::setupResources(void) { // Load resource paths from config file Ogre::ConfigFile cf; cf.load(mResourcesCfg); // Go through all sections & settings in the file Ogre::ConfigFile::SectionIterator seci = cf.getSectionIterator(); Ogre::String bunPath = Ogre::macBundlePath() + "/" ; Ogre::String secName, typeName, archName; while (seci.hasMoreElements()) { secName = seci.peekNextKey(); Ogre::ConfigFile::SettingsMultiMap *settings = seci.getNext(); Ogre::ConfigFile::SettingsMultiMap::iterator i; for (i = settings->begin(); i != settings->end(); ++i) { typeName = i->first; archName = bunPath + i->second; Ogre::ResourceGroupManager::getSingleton().addResourceLocation( archName, typeName, secName); } } } -
Let's modify accessibility to class BaseApplication.
Make setup() and destroyScene() public and add an inline function get_Root() which allows access to Ogre's root object.... virtual ~BaseApplication(void); virtual void go(void);protected:virtual bool setup(); virtual void destroyScene(void); Ogre::Root* get_pRoot() const { return mRoot ; } protected: virtual bool configure(void); virtual void chooseSceneManager(void); virtual void createCamera(void); virtual void createFrameListener(void); virtual void createScene(void) = 0; // Override me!virtual void destroyScene(void);virtual void createViewports(void); ... -
This is optional but this will make the camera naturally move along a touch on the screen.
Add the next line to the end of BaseApplication::createCamera() method.mCameraMan->setStyle( OgreBites::CS_ORBIT ) ;The camera will orbit the origin point (0,0,0). Don't forget that this camera movement is really restricted. Later you can set a different style like CS_MANUAL for maximum freedom.
Sunday, June 24, 2012
3DS Max Biped in 'Set Key' Mode
3DS Max doesn't allow you to use [Set Keys] button with bipeds in [Set Key] mode, which is usually enabled by pressing [Set Key] button in the bottom-right corner of the main window.
 That's because bipeds are involved with the very complex inverse kinematics such that only a component of a biped can't independently move. If you move up a finger tip, all the connected knuckles get to follow it up. So you should be working on your animation with bipeds in [Auto Key] mode.

However, sometimes you really need to manually set some keys.Yes, you can.
To begin with, select parts of interest(like the feet) of a biped and open the motion panel on the right. Find the [key info] roll-out in the middle and expand it. You can see a row of buttons which you can set various kinds of manual keys with. You can use them like the way you use the normal key button in [Set Key] mode.
I actually used 'Set Planted Key', the third button to fix the feet on the floor while shaking the hips.
with bipeds in [Set Key] mode, which is usually enabled by pressing [Set Key] button in the bottom-right corner of the main window.

However, sometimes you really need to manually set some keys.Yes, you can.
To begin with, select parts of interest(like the feet) of a biped and open the motion panel on the right. Find the [key info] roll-out in the middle and expand it. You can see a row of buttons which you can set various kinds of manual keys with. You can use them like the way you use the normal key button in [Set Key] mode.
I actually used 'Set Planted Key', the third button to fix the feet on the floor while shaking the hips.
Saturday, June 16, 2012
My .gitignore for XCode
# Mac OS X
*.DS_Store

# vi editor
*.swp

# Xcode
*.pbxuser
*.mode1v3
*.mode2v3
*.perspectivev3
*.xcuserstate
xcuserdata/
build/
*.pch.*
*~.nib
Friday, June 8, 2012
Simply Make My First Irrlicht App for iPhone(iOS) with XCode 4.2
Before you start, you need to successfully compile Irrlicht library. To do it, you can refer to this posting.
Hereafter I adapt the first one of the official Irrlicht tutorials.
Hereafter I adapt the first one of the official Irrlicht tutorials.
- Irrlicht for OpenGL ES only deals with textures with a 2-powered size.
Get 'media/sydney.bmp' in Irrlicht library source folder(Irrlicht_ogles from the prerequisite guide). Open it with your graphic application and scale it to width 256 pixels and height 256 pixels. Changing only the size without scaling doesn't work. Save it as sydney256x256.bmp. - Let's create an XCode project. Run XCode 4.2.
On the menu, choose File - New - New Project. In the dialog box that pops up, choose the top-right item, Simple View Application in iOS-Application section.Let's name it IrrlichtApp. Choose the parent folder of Irrlicht library source folder so that this new project resides next to Irrlicht library source folder.
Change all the extensions .m to .mm (ViewController.m, AppDelegate.m, [Supporting Files]/main.mm) to .mm in order to compile C++. - Let's add a few graphic assets.
Run Finder and open the folder of this project. Next to your IrrlichtApp.xcodeproj, create a folder named Assets. Copy sydney256x256.bmp into Assets folder and copy sydney.md2 from 'media' folder in Irrlicht library source folder into Assets folder. Right-click on the project head(red rectangle in the picture) in the leftmost column and Choose Add Files to "IrrlichtApp"... on the popup menu.In the dialogbox that pops up, find and click on Assets folder and in the lower part therein choose Create folder references for any added folders among the options. Click Add button.

- Let's make this app full-screen without the status bar at the top.
Expand IrrlichtApp/Supporting Files under the project head and click on IrrlichtApp-Info.plist. A table show up to the right. Right-click on the white space under the last table item. Choose Add Row on the popup menu.A new item at the end shows up with a pop-up list as in the next picture. Choose Status bar is initially hidden from the list. Click the spinner(red rectangle in the next picture) on the right side of the third column(Value) of the new row in the table.
 Choose YES from the pop-up list.
- Let's add Irrlicht library as project.
Right-click on the project head in the leftmost column and choose Add Files to "IrrlichtApp"... on the popup menu. Find source/Irrlicht/MacOSX/MacOSX.xcodeproj in Irrlicht library folder and choose it.
Click on IrrlichtApp project head in the leftmost column. To the right, click on IrrlichtApp under PROJECT, the first section in the second column, To the right, click on Build Settings tab at the top in the table. Scroll the long table down a lot until you find Search Paths section and double-click the input cell on the right of Header Search Paths row(instead you can use the search box at the top of this table). In the popup dialogbox that shows up, click on the plus-sign button in the lower-left corner as in the next picture.The first row will be activated for input. Type '../Irrlicht_ogles/include' into the activated right cell and click Done button in the bottom-right corner.
- Let's add necessary libraries for linking.
In the second column from the left, click on IrrlichtApp under TARGETS, the second section and to the right, click on Build Phases tab at the top.Expand the third bar by clicking on the dark small triangle at the left of the bar and click on the plus-sign button in the bottom-left corner of the opened bar. In the dialogbox that has shown up, choose libIrrlicht.a under Workspace section as in the above picture and click Add button in the bottom-left corner. Also add OpenGLES.framework, QuartzCore.framework under iOS 5.0 section in the same way.
-
Let's establish the project dependency.
You still stay at [Build Phases] tab. Loot at the first bar named [Target Dependencies] and by clicking the dark triangle at the left of the bar, expand it.Click the plus-sign in the bottom-left corner of the opened bar and the dialogbox in the next picture pops up. Choose libIrrlicht.a under [IrrlichtApp/MacOSX]. Make sure that a new item named [libIrricht.a (MacOSX)] is inserted in the opened bar.
- Let's add actual code.
Note that in the following, lines in the boldface need to be added.
Open IrrlichtApp-Prefix.pch, the precompiled header under IrrlichtApp/Supporting Files and add the following code.#ifdef __OBJC__ #import <UIKit/UIKit.h> #import <Foundation/Foundation.h> #import <QuartzCore/CoreAnimation.h> #endif #ifdef __cplusplus #include <irrlicht.h> using namespace irr ; using namespace core ; using namespace scene ; using namespace video ; using namespace io ; using namespace gui ; #endif
Open ViewController.h and add the following code.@interface ViewController : UIViewController { CADisplayLink* m_oDispLnk ; IrrlichtDevice* m_pDevice ; } @end
Open ViewController.mm and add the following code.-(void) viewWillAppear:(BOOL)a_animated { [super viewWillAppear:a_animated]; SIrrlichtCreationParameters params; params.DriverType = video::EDT_OGLES1; params.WindowSize = core::dimension2d<u32>(320,480); params.WindowId = self.view; params.Bits = 32; m_pDevice = createDeviceEx( (const SIrrlichtCreationParameters)params ) ; if( ! m_pDevice ) return ; NSString* oBunPath = [ [NSBundle mainBundle] bundlePath ] ; m_pDevice->getFileSystem()->changeWorkingDirectoryTo( [oBunPath cStringUsingEncoding:NSASCIIStringEncoding] ) ; IVideoDriver* driver = m_pDevice->getVideoDriver() ; ISceneManager* smgr = m_pDevice->getSceneManager() ; IAnimatedMesh* mesh = smgr->getMesh( "./Assets/sydney.md2" ) ; if( ! mesh ) return ; IAnimatedMeshSceneNode* node = smgr->addAnimatedMeshSceneNode( mesh ); if( node ) { node->setMaterialFlag(EMF_LIGHTING, false); node->setMD2Animation(scene::EMAT_STAND); ITexture* pTex = driver->getTexture( "./Assets/sydney256x256.bmp" ) ; node->setMaterialTexture( 0, pTex ) ; } smgr->addCameraSceneNode( 0, vector3df(0,30,-40), vector3df(0,5,0) ) ; // iOS timer. m_oDispLnk = [ [UIScreen mainScreen] displayLinkWithTarget:self selector:@selector(updateDisplay) ] ; [ m_oDispLnk addToRunLoop:[NSRunLoop currentRunLoop] forMode:NSRunLoopCommonModes ] ; } -(void) updateDisplay { m_pDevice->run() ; m_pDevice->getVideoDriver()->beginScene( true, true, SColor(255,100,101,140) ) ; m_pDevice->getSceneManager()->drawAll() ; //m_pDevice->getGUIEnvironment()->drawAll() ; m_pDevice->getVideoDriver()->endScene(); } -(void) viewDidDisappear:(BOOL)a_animated { [super viewDidDisappear:a_animated]; if( m_oDispLnk != nil ) [ m_oDispLnk invalidate ] ; if( m_oDispLnk != NULL ) m_pDevice->drop(); }
Save all the files(Opt-Cmd+S). - Now build and run it(Cmd+R).


Wednesday, June 6, 2012
Compile Irrlicht for iPhone(iOS) in XCode 4.2
- Run Finder, open Applications/Utilities folder under FAVORITES, or run Launchpad on Dock and open Utilities folder on the first page. Run Terminal in either of them.
By using 'cd' command, go to the location where you want to put the Irrlicht source files.
Create a folder called Irrlicht_ogles by typing in and running "mkdir Irrlicht_ogles", which Irrlicht Engine source files will be downloaded into.
Go into the folder by typing in and running "cd Irrlicht_ogles" - Download the source files by running the next command at the Terminal prompt. Make sure that you put a space and a dot at the end. I got the URL address from here.
$ svn co -r 4073 http://irrlicht.svn.sourceforge.net/svnroot/irrlicht/branches/ogl-es .
- Find the file source/Irrlicht/MacOSX/MacOSX.xcodeproj in the folder. Double-click it to run XCode 4.2 or open it in XCode 4.2
- Click Active Scheme button in the topleft corner, which is in the red rectangle in the next picture.
The scheme popup menu appears. Choose libIrrlicht.a as in the next picture.

-
Click MacOSX at the top of the left column. To the right, choose MacOSX under PROJECT in the next column. In the table to the right, find Base SDK under Architectures and click the input cell to the right of it. When a popup menu appears, choose Latest iOS as in the next picture. At Architectures entry right above Base SDK, click the input cell to the right of it. Choose Standard in the popup menu as in the next picture.


-
In the second column from the right, choose libIrricht.a (in the red rectangle) right under TARGETS, the next entry after PROJECT which we just worked in. In the table to the right, find Architectures under Architectures and click the input cell to the right. Choose Standard in the popup menu as in the next picture.Find Compiler for C/C++/Objective-C under Build Options, the third section, click the input cell to the right. Choose Default Compiler in the popup menu as in the next picture.


-
In the toolbar at the top, click right on text "iOS Device" on Active Scheme button on the left part. Choose iPhone 5.0 Simulator in the popup menu.

- In the bottom left corner, type "OSX" into the filter box in the red rectangle in the next picture. Some pertinent files appear above in the leftmost column. Right-click OSXClipboard.mm and choose delete. When the dialogbox pops up. choose Remove Reference Only.
- Clear the text you typed in the filter box and expand MacOSX in the left-most column to Irrlicht/Engine/irr/device. Create a new group called iOS within "device" and add files CIrrDeviceIPhone.* in the folder source/Irrlicht into the new group. Expand to Irrlicht/Engine/video and create another new group called OpenGL_ES1 within "video", Add files COpenGLES*.* in the folder source/Irrlicht into the new group but don't choose COpenGLES2*.*
- Try to build(cmd+B). Some build errors show up with CImageLoaderPNG.cpp and CImageWriterPNG.cpp.
Change the erroneous linelongjmp(png_ptr->jmpbuf, 1);tolongjmp(png_jmpbuf(png_ptr), 1);and the erroneous lineio::IReadFile* file=(io::IReadFile*)png_ptr->io_ptr;toio::IReadFile* file=(io::IReadFile*)png_get_io_ptr(png_ptr);Now you should see that Build libIrrlicht.a has succeeded.


Subscribe to:
Posts (Atom)